Browsing Category

Fall

Fall

Pumpkin Spice Mix

Making your own allows you to focus on the flavours you and your family like. The mix is so easy to make, it’s just not worth buying. Use it for your pumpkin bread, pumpkin pie, lattes, in mashed or roasted squash, in sweet potatoes, stirred in oatmeal or added to homemade apple sauce or baked apples. Did you know you can freeze baked apples lightly cooked and then reheated in the oven for 15 minutes?!! The sky is the limit. Keep the mix on hand for Fall and the holiday season.

Pumpkin Spice Mix

(No Ratings Yet)

Ingredients

  • 2 TBSP ground cinnamon
  • 4 tsp ground ginger
  • 1 tsp ground cloves
  • ½ tsp nutmeg, ground
  • ¼ tsp allspice
  • ¼ tsp ground black pepper (optional)
  • ¼ tsp ground cardamon (optional)
Fall/ Preserving Recipes

Zucchini Mania

Zucchini Pancakes

This summer has been amazing for zucchini. As always, I’m interested in the story of food. Summer squash is the broad category of tender gourds which grow in summer. Zucchini is a member of that family, but it also includes yellow, Crookneck and Pattypan squash among others. These vegetables were brought to North America in the mid 1500s by Italians. No surprise there. They have great versatility in the kitchen.

In the last weeks I’ve canned zucchini relish & tangy and sweet zucchini & yellow squash pickles; I’ve baked and frozen several zucchini breads; I’ve made salads, grilled them, sauteed them with and without pasta; I’ve dehydrated zucchini chips and have frozen grated amounts that will be useful for an impromptu zucchini bread in winter. I’ve also given away a lot! Today, I want to focus on two recipes I’ve recently made: First is zucchini lasagna and the second zucchini pancakes. Even my husband, a staunch carnivore and one who claims to be allergic to all vegetables except corn and potatoes, thought they were good!

For the lasagna, I used my canned marinara sauce, but any tomato sauce will do. I had a few oven-ready noodles, so I threw them in, but they really are optional. The zucchini/yellow squash act like noodles. As with any lasagna recipe, there are various layers. In this case, a layer of ricotta mixture and a layer of creamed Swiss chard and leeks from the garden. Mozzarella, parmesan and off you go to a great meal now or in winter. Check out the full recipe on my webite.

So many ways to use and preserve summer squash. From stuffed blossoms, to pickles, baked goods, pasta and more, these gourds provide a year-round healthy, low-calorie vegetable for even the most vegetable-averse folks!!

preservingwithmartha@gmail.com

www.thevalleypreservery.ca

Zucchini Pancakes

(No Ratings Yet)

Ingredients

  • These are delicious! Freeze them for a great side-dish or even as a vegetarian option.
  • 1 pound summer squash (use zucchini, yellow squash or other)
  • Wash and cut squash avoiding seeds. Then weigh the 1 lb.
  • Grate the squash using a large-hole box grater. Lightly salt and put it in a sieve over a bowl for at least 20 minutes. Then squeeze vigorously to remove moisture.
  • 2 eggs lightly beaten
  • 1/5 tsp pepper, 1/5 tsp salt
  • 1/3 cup organic or gluten free flour
  • 3-4 chopped green onions
  • 1/3 cup chopped parsley
  • ½ mixed herbs (I used tarragon and basil but use what the garden provides)
  • 4 oz cheese (I used feta crumbled but you could substitute grated cheddar, gruyere, or any other cheese)

Instructions

1

Mix drained zucchini with all ingredients. Put a couple of tablespoons of cooking oil in the sauté pan and drop ‘batter’ by tablespoons into the hot pan. Cook about 3-4 minutes a side until brown. Place on a parchment lined cookie sheet and sprinkle with finishing salt. Serve warm or at room temperature. Or, cool completely and freeze.

Fall/ Preserving Recipes

Transitioning to Fall

Apple-Rhubarb Chutney (adapted from Bernardin)

Fall is just around the corner. That means cool weather preserving with tomatoes and Fall fruits. This week, I harvested some rhubarb (the vegetable that keeps on giving) and combined it with apples for a truly Fall inspired chutney with dried cranberries. Nothing says transition more than combining spring and Fall fruits!

As I prepared the apples for the chutney, I treated them to prevent oxidization. That reminded me of a woman in the grocery store who was asking whether citric acid could be used as a substitute for ascorbic acid. I thought it might be useful to explore that question.

There are two reasons to use acids: First to prevent browning or oxidation. And second to acidify foods that are not naturally acidic enough to be safely preserved.

Oxidation is a naturally occurring phenomenon that happens when pale fruits and vegetables are exposed to oxygen. Apples, pears, peaches, and some vegetables will turn a brownish colour in the presence of air. Treating them with acid prevents this from happening.

Ascorbic Acid (Vitamin C)

Six crushed Vitamin C tablets in 2 litres of water will do the trick to prevent browning. The tablets are easily available in pharmacies. A 10-minute dunk in the acid/water bath will help hold the colour of fruit as you prepare the recipe.

Citric Acid can also be used to prevent oxidation with cut fruit or as a pre-treatment for frozen or dried fruit. Alternatively, using lemon juice in a solution of ¼ cup lemon juice to 2 litres of water will provide an effective solution for prevent oxidation. Many people choose to use Fruit Fresh, a commercial anti-browning agent that contains citric and ascorbic acids and silicon dioxide. I like lemon juice as it contains both ascorbic and citric acid and it’s natural!

Citric vs Ascorbic Acid

The question is whether these two acids can be used interchangeably? The answer is NO. While citric acid can be used as an anti-browning agent, it is mostly used to lower pH in foods as it is far more acidic than ascorbic acid. For example, tomatoes, which hover around the 4.6 pH level need to be acidified for safe canning. Citric acid or lemon juice are effective for this purpose. Ascorbic acid is a strong antioxidant and preserver of colour but is not used alone to acidify foods. As always, use authoritative recipes that will recommend the type and amount of acid to prevent oxidation or to properly acidify food.

Transitioning to Fall brings a whole new life to the preserving kitchen. Aromas of spice, mixed with fruit, tomato bubbling with vegetables for chili sauce. It feels like a new season is upon us.

preservingwithmartha@gmail.com

Apple-Rhubarb Chutney (adapted from Bernardin)

(No Ratings Yet)

Ingredients

  • 4 cups diced peeled and cored apples treated to prevent oxidation. I used Sunrise Apples and Granny Smith.
  • 2 cup chopped rhubarb
  • ½ cup water
  • Zest and juice of one lemon.
  • ½ cup dried cranberries or use raisins, currants, dried cherries, or blueberries
  • 1 tsp cinnamon
  • ½ tsp each nutmeg and ground allspice

Instructions

1

After draining apples, combine with rhubarb, sugar, water and lemon juice and zest. Boil gently for 15 minutes. Add dried fruit and spices. Continue gently boiling for another 15 minutes until the chutney thickens. Ladle into 4 250ml hot jars leaving a ½ inch headspace. Remove bubbles and adjust headspace. Clean rims and affix lids and rings to finger-tip tight. Process in a water-bath or steam canner for 10 minutes adjusting for altitude. Allow jars to rest for 5 minutes before removing to a heat-proof surface.

Fall/ Preserving Know-how

No Root Cellar? No Problem!

This is the time of year to stock up on pesticide free root vegetables and fruit. Some of the lucky ones have root cellars designed specifically for preserving the harvest through winter. Others of us might not be as lucky. But there are alternatives to help preserve the bounty. Do you have a closet with an outside wall or a room where the baseboard heater can be turned off? Do you have a mudroom, porch, cellar, attic, shed or barn to use for storage? Do you have picnic coolers to insulate produce, garbage bins or food-grade plastic containers as preserving vessels? All of these are options to help retain the quality of fruit and vegetables.

The key to preserving the Fall harvest is understanding what fruits and vegetables need in terms of temperature, air circulation and moisture. Once you have that knowledge, many creative root cellar substitutes can be used.

Cold and Moist (0-4.5 degrees Celsius) with 90% humidity)

Beets, carrots, turnips, radishes .

Store in dampened sand or sawdust. Choose your container and moisten the sand or sawdust layering vegetables. Carrots go straight down into the sand.

Cold and Dry (0 – 4.5 C with 60 – 70% humidity)

Apples, pears, Brussel Sprouts, potatoes.

Store apples separately as they produce ethylene gas. Even in the refrigerator store apples away from other fruit and vegetables.

Potatoes need a dark environment to prevent the development of greening and related toxins. Note: Do not refrigerate potatoes as this will cause their starch to convert to sugar.

Cool and Dry (0 –10C and low humidity)

Onions, garlic, shallots.

Braid garlic and hang. Place onions or shallots in breathable mess bags or use a pantyhose leg tying a knot between each onion. Snip off the stocking below the knot to release the onion one at a time. For larger quantities, use a bushel basket, orchard rack or cardboard box with holes. Moisture is the enemy for onions, so they need lots of circulation.

On the Warmer Side and Dry (up to 15C and dry)

Pumpkins, squash, and sweet potatoes.

Many vegetables such as potatoes, pumpkins, squash, and onions benefit from a curing phase before storing. Allowing them to sit on a porch for 10 days when temperatures are moderate allows the skins to firm up and readies the vegetables for winter storage.

So, understand what your vegetables and fruit need – temperature, moisture, air circulation. Choose a location and a vessel. And remember that many root crops can stay in the earth until needed if they are well covered with stray or hay. In fact, vegetables like parsnips and carrots benefit from a frost. The chill sweetens the flavour!

Even without an official root cellar or cold room, it is possible to store vegetables and some fruit for many months during the winter. Even one container of beautiful potatoes kept in the garage or chilly room will bring plenty of great taste to a winter meal. It’s simple to preserve good, healthy food!

Preservingwithmartha@gmail.com

www.thevalleypreservery.ca

Fall/ Preserving Recipes

Carrot and Parsnip Soup with Cumin & Thyme

Carrot and Parsnip Soup with Cumin & Thyme

(No Ratings Yet)

This soup freezes very well. It is creamy but made without cream. The vinegar is important in this recipe to achieve balance as the root vegetables are sweet. This is a wonderful Fall or Winter soup.

Ingredients

  • 1 lb carrots, trimmed, peeled, and chopped
  • 1 lb parsnips, trimmed, peeled, and chopped
  • 2 litres vegetable broth
  • 2 TBSP olive oil
  • 1 large onion, peeled and diced
  • 1 clove garlic, grated using a micro plane or finely chopped
  • ¼ tsp hot chilli flakes
  • 1TBSP fresh thyme or 1 tsp dried
  • 1.5 tsp cumin
  • ¼ cup apple cider vinegar
  • Salt and pepper to taste

Instructions

1

In a Dutch oven or heavy bottomed pot, heat olive oil over medium heat. Sauté onions stirring until translucent and soft, about 10 minutes. Stir in garlic and hot pepper flakes and stir one minute. Add the carrots, parsnips, and broth. Bring to a boil, reduce heat and simmer until vegetables are soft – about 25 minutes. Stir in cumin and thyme. Add in vinegar and stir. Adjust seasoning by adding salt and fresh ground pepper.

2

To serve: Place the soup in a bowl. Add a dollop of sour cream, crème fraiche and a sprinkle of chopped fresh thyme

Fall/ Preserving Recipes

Trending This Thanksgiving – Cranberry Apple Pear Relish

Cranberry Apple Pear Relish

Thanksgiving in Canada is said to have been inspired by Fist Nations people giving thanks to The Mother for crops, game and all the Earth provides. Modern Canadian Thanksgiving was first celebrated 43 years before American Thanksgiving according to historian Alison Nagy. In the late 1500’s and early 1600s, French settlers and Mi’kmaq held feasts of thanksgiving which is where the Mi’kmaq introduced the French to cranberries as “les petites rouges”. Since then, cranberries have played a central role in our holiday traditions.

Cranberry sauce and jelly have been around for decades, first being canned by Mr. Urann in 1912 under his company name “Ocean Spray Preserving Company”. Today Ocean Spray sells 70 million cans of cranberry sauce! Pretty amazing given how easy it is to make!

Last year I profiled a wonderful cranberry sauce recipe from Canadian Living which uses apple juice to help with the sweetness reducing the sugar. I love this recipe and will make again this year. Having cranberry sauce in the pantry is handy year-round. It’s great with turkey, chicken, vegetable casseroles, pot pies, sandwiches, and even mixed with mustard for a fondue dip. But what’s trending this year?

In the recent edition of Cook’s Illustrated magazine, they focused on cranberry relish as an alternative to traditional cranberry sauce. Their recipe used raw cranberries with oranges or clementines. For long-term storage, I found this flavourful recipe by Topp & Howard for cranberry, apple, and pear relish with a hint of orange. It is excellent.

Cranberry Apple Pear Relish

(No Ratings Yet)
Serves: 5-6 250ml jars

This relish is a lovely compliment to turkey, but it is also good for glazing oven roasted carrots or parsnips. I’ve used it to top baked sweet potato rounds as an appetizer. Get trending this holiday and try cranberry relish instead of, or in addition to cranberry sauce!

Ingredients

  • 3 cups fresh or frozen cranberries
  • 3 apples, peeled, cored, and chopped
  • 2 pears, peeled, cored, and chopped
  • 1.5 cups golden raisins
  • 2 cups granulated sugar
  • 1 cup orange juice
  • 2 TBSP grated orange rind
  • 2 tsp cinnamon & ¼ tsp nutmeg
  • ½ orange liqueur (optional)

Instructions

1

In a Dutch oven, combine fruits, raisins, sugar, orange juice & rind, cinnamon, and nutmeg.

2

Bring to a boil.

3

Reduce heat and boil gently for about 25 – 30 minutes, stirring occasionally, until the mixture thickens.

4

Remove from heat and stir in liqueur if using.

5

Ladle into hot 250ml jars leaving a ½ headspace.

6

Remove air bubbles and adjust headspace.

7

Apply lids and rings to clean rims and tighten to “finger-tip” tight.

8

Process in a boiling water bath or atmospheric steam canner for 10 for 250ml jars and 15 minutes for 500ml jars, adjusting for altitude.

Fall/ Preserving Recipes

All Mixed Up! Antipasto Pickles

Antipasto Pickles (Canadian Living)

The end of summer means the garden and vegetable stands are overflowing with produce! It is the perfect time of year to gather together those vegetables and get pickling. Mixed pickles are fabulous as an accompaniment or added to a salad in the winter months when veggies are expensive and of lower quality. Mixed pickles are my favorite. They are beautiful, useful, and always remind us during the dark days that the garden will again renew its colourful bounty.

I have made many recipes for mixed vegetables. Hot Mixed Pickles, Mustard Pickles, Jardiniere (Bernardin). The only Bernardin recipe I didn’t like was one for the “End of Garden” pickle. The flavour was fine but the use of brown sugar as a sweetener darkened the brine to a muddy brown colour which was visually unappealing. I have made countless batches of Topp & Howard’s “Winter Pickle”. What I particularly like about this recipe is they provide specific quantities of vegetables but, in a note, they say to use whatever vegetables you like if they are chopped evenly and measure 8 cups. That gives flexibility which is nice. This weekend I tried Canadian Living’s “Antipasto Pickle” and it is lovely. Quite delicate with the mixture of wine and vinegar steeped with a nice flavourful spice mix.

Antipasto Pickles (Canadian Living)

(No Ratings Yet)
Serves: 6 - 500ml jars

Let’s get “mixed up” using the many recipes for mixed vegetables pickles. Whether you like them hot, sweet, unsweet or with a mustard base, all are wonderful additions to the winter pantry.

Ingredients

  • Spice Bag: In cheesecloth tie together:
  • 4 cloves smashed garlic
  • 3 bay leaves
  • 1 TBSP coriander seeds
  • 2 tsp fennel seeds
  • 1 tsp black peppercorns
  • Brine:
  • 2.5 cups white wine vinegar
  • 1.5 cups white wine
  • ¼ cup sugar
  • 4 tsp pickling salt and spice bag.
  • Vegetables:
  • 3 cups cauliflower florets
  • 3 cups peeled and diced eggplant
  • 2.5 cups green beans cut in 1-inch lengths
  • 2 cups chopped onions
  • 2 cups each green and red peppers
  • 1.5 cups chopped carrots
  • 1.5 cups chopped celery
  • 1.5 tsp oregano divided
  • 1 tsp hot pepper flakes divided

Instructions

1

Bring brine to a boil and simmer 5 minutes.

2

Add vegetables and return to the boil cooking 5 minutes to soften.

3

Remove spice bag.

4

In each hot jar, add ¼ tsp oregano and small pinch hot pepper flakes (optional).

5

With slotted spoon ladle vegetables into jars.

6

Use a chopstick or plastic knife to remove air.

7

Ladle brine into each jar leaving ½ inch headspace (Note: for clear brine, strain through a fine sieve before ladling,).

8

Remove bubbles.

9

Clean rims, affix lids and rings to finger-tip tight.

10

Process in a water bath or atmospheric steam canner for 10 minutes and rest for 5 minutes.

11

Transfer to cooling rack and leave undisturbed for 24 hours.

12

Check seals.

Notes

As always, use only recently developed recipes for canning including pickling (within 20 years). Old recipes do not generally have sufficient acidity to be considered safe. Remember the 50-50 rule: For pickling, brine ratios should be 50% vinegar to water. Finally, modern recipes are tested using 5% vinegar. There is no reason to purchase newly marketed “pickling vinegar”.

Fall/ Preserving Know-how

The Grape Harvest

Nothing says approaching autumn more than grapes. We are so fortunate to live in an area where there are lots of wild grapes as well as other domesticated varieties like Concord and Coronation. Wild grapes can be found along riverbanks, beside ponds and growing up trees with their long tendrils. They are edible but eaten off the vine back a mean bitter punch, so they are best used for juicing rather than eating. Whether using foraged wild grapes or domesticated grapes, both are wonderful to preserve as juice or jelly.

Extracting juice: Steam juicers make quick work of extracting juice from fruits including grapes. But if you don’t have one, no problem. For a typical jelly batch, 3.5 lbs of grapes, washed and removed from stems will yield 10 cups of grapes. In a large pot, crush grapes with 1 cup of water and cook gently for 10 minutes. Pour the mash into a dampened jelly bag or cheesecloth lined sieve and allow the juice to naturally drip out (no squeezing!). In about 2 hours, you will have about 4 cups of juice. No interest in extracting your own juice? You can also buy it locally. Check with http://fiddleheadnursery.ca

Grapes are one of the few fruits (technically a berry) that has a natural abundance of tartaric acid. The acid binds with naturally occurring potassium forming crystals that sink to the bottom of the container. You might have seen this phenomenon in a glass of red wine. To ensure the juice you process is clear, it’s recommended that you extract the juice and let it sit refrigerated for at least 2 days. Pour the juice through a dampened jelly bag avoiding the last bits of the juice. Juice can be processed for long-term storage or frozen.

Grape jelly is the quintessential match for peanut butter in the iconic PB&J. The jelly is great with cheese or melted and used as a glaze on seared duck breast. It is also useful in baking like adding a dollop into a muffin mix before baking, topping a thumbprint cookie, or spreading over a genoise cake and rolled into a “Jelly Roll”.

The grape harvest is upon us. Gather up the family and forage along the riversides, collect grapes from friends or purchase them locally. Grapes are a gift of nature with endless possible uses.

Martha Rogers

www.thevalleypreservery.ca

Preservingwithmartha@gmail.com


Grape Jelly

(No Ratings Yet)

Ingredients

  • 4 cups of grape juice
  • 1 package pectin crystals
  • 5 cups sugar

Instructions

1

Mix the pectin into the juice and bring to a hard boil. Add the sugar all at once. Bring back to boil and boil hard 1 minute. Ladle into hot 250ml Mason jars. For long-term storage, process the jars in a water-bath or steam canner for 10 minutes. Allow to rest 5 minutes before removing from the canner. For short-term storage, simply allow the jars to cool, label and store in the fridge for up to 3 months. This makes about 7 jars.

Fall/ Preserving Recipes

Sage and Roasted Walnut Pesto

Sage and Roasted Walnut Pesto

Sage and Roasted Walnut Pesto

(No Ratings Yet)

Ingredients

  • 1 cup sage leaves compressed
  • 2 cups parsley leaves compressed
  • 1 large or 2 small garlic cloves
  • ¾ cup olive oil
  • 1 cup chopped walnuts roasted until lightly browned
  • 2/3 cup grated parmesan
  • Salt & pepper to taste

Instructions

1

Roast walnuts in a 350 degree oven until brown. About 5 to 10 minutes.

2

In a food processor, with the engine running, drop the peeled garlic through the feed-tube until finely chopped. Put sage and parsley into the bowl and whiz it until it is fairly finely chopped. With the engine going drizzle in the olive oil. You may need to adjust the amount to achieve the texture you like.

3

Stir in the parmesan and chopped walnuts. Add salt and pepper to taste. Remember that the parmesan is salty so add salt after the cheese has been added.

4

Serve with penne or spirals (pasta that will hold the sauce), regular or gluten free. If you want, add fried sage leaves for a little extra pizzaz. I freeze this pesto in food grade plastic containers.


Fall/ Preserving Know-how

Autumn Herb Bouquets

Herb Bouquet

The winds are blowing, the evenings are cool, and the end of season is in sight. But before the weather turns, it’s time to pick the final herb bouquets to dry, freeze and store for winter. Of course, using them fresh while they last is wonderful too!

Freezing:

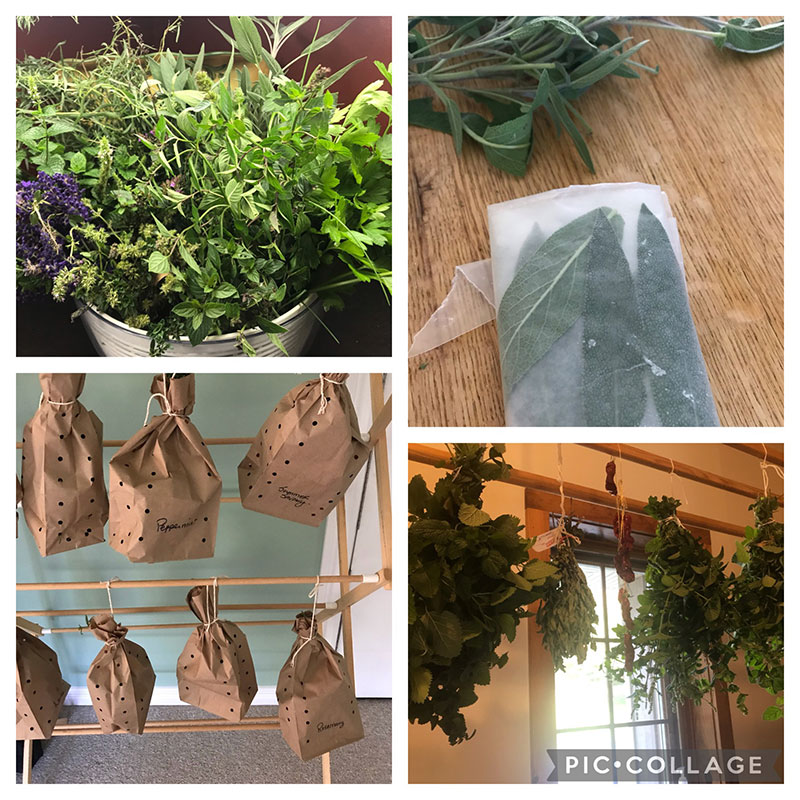
Some herbs are better frozen than dried because the drying process reduces flavour. A typical freezing method is chopping herbs, adding a bit of water, and placing them in ice cube trays. They can be tossed into a soup, sauce, or pasta. I also chop herbs like mint and cilantro in amounts required for favorite recipes. One or two tablespoons of the herbs are placed in tiny mini paper bags I found at Michael’s. I freeze sage whole in wax paper as shown above and then placed in a small freezer bag. Since I love sage with squash and sweet potatoes, I will often freeze the cooked vegetables with sage and brown butter for use later in the season.

Drying:

I have a dehydrator, but I don’t bother with it for herbs. They dry well using less energy-consuming methods. For smaller quantities I put bunches in a paper bag with air holes created using a hole punch. Each bag is labelled and tied to my portable laundry rack. Pictured above are various herbs that will be used for home-made Herbes de Provence. For larger quantities such as those I use for teas (mint, lemon balm, lemon verbena, bergamot), I hang them on my main laundry room rack (until there’s no more room for my husband’s shirts!). Drying can also be done in the oven simply by placing herb leaves on a screen, perforated pizza disk or a cookie sheet. Turn on the oven light and leave the herbs to dry overnight. Small amounts can be dried quickly in the microwave. Thyme (my most used herb), basil, parsley, savoury, tarragon, lavender, oregano, marjoram, rosemary, bay laurel and chives are all suitable for drying. If you are drying herbs, thoroughly shake and dust them off but don’t rinse them. The water can contribute to mold growth.

Fresh:

Capturing the end of season herbs is every cook’s delight. Take pesto for example. Use up basil, parsley & chives in a traditional pestos. Get creative with a sage-parsley and toasted walnut pesto. Freeze the pesto. Quick fry sage as an accompaniment to a pre-dinner drink or atop of a sage-butter pasta. Use herbs for a stuffing for pork, poultry, peppers, or cabbage. For a casual dinner, whip up brown butter scrambled eggs with herbs and an end of season green salad. The sky’s the limit.

Overwintering:

Finally, it’s time to bring in the herbs indoors. I bring in parsley, sage, rosemary, thyme and bay laurel and put them in a west-facing window. As the sun diminishes, I add a small grow light on a timer to keep the herbs going until spring.

The blessings of the autumn herbs are wonderful. Dry them, freeze them, use them fresh or use them in preserves, and bring them in for the winter! Keep the faith until spring!

For more information:

Preservingwithmartha@gmail.com

For information: preservingwithmartha@gmail.com