Browsing Category

Summer

Preserving Recipes/ Summer

Strawberry-Rhubarb Galette


Strawberry-Rhubarb Galette

1 Star2 Stars3 Stars4 Stars5 Stars (No Ratings Yet)
Loading...

Ingredients

  • Sour Cream Pastry
  • 2 and ¼ cups all purpose flour
  • ¼ cup cake flour
  • 1 tsp salt
  • 1 tsp sugar
  • ½ cup cold unsalted butter cubed
  • ½ cup cold shortening cubed
  • ¼ cup plus 2 TSBP sour cream
  • 2 TBSP ice water
  • Strawberry-Rhubarb Galette Filling
  • 5 cups rhubarb chopped, 2 cups strawberries quartered
  • ¾ cup sugar
  • 1/3 cup flour
  • 1/3 cup store-bought or home-made amaretti crumbled

Instructions

1

In a food processor, blend dry ingredients. Then add butter and shortening and process until the mixture looks like course meal. Mix sour cream and water together and add to the bowl and blend together until pastry starts to come together in a ball. Bring together into a ball, divide in two, flatten and wrap in plastic wrap to cool in the fridge or to freeze.

2

For the galette, use one half of the pastry. Roll out in a circle at a thickness of ¼ inch. Remember to leave 2 ½ inches that will fold over the strawberry-rhubarb mixture. Place the pastry on a parchment line rimless baking pan.

3

Strawberry-Rhubarb Galette Filling

4

5 cups rhubarb chopped, 2 cups strawberries quartered

5

¾ cup sugar

6

1/3 cup flour

7

1/3 cup store-bought or home-made amaretti crumbled

8

Sprinkle the amaretti on top of the rolled-out pastry. Mix remaining ingredients and pile in the middle of the pastry. Spread around leaving 2 ½ inch edge. Fold the pastry over the filling, pleating it to create the edge. Bruch the pastry with an egg wash and sprinkle with sugar.

9

The filling will look nicer if you brush the fruit with a glaze such as melted apple or rhubarb jelly.

10

Bake in the lower rack of a 425-degree oven for 10 minutes. Then reduce heat to 375 and bake for another 50 – 55 minutes.

Preserving Recipes/ Summer

Rhubarb Ice Cream


Rhubarb Ice Cream

1 Star2 Stars3 Stars4 Stars5 Stars (No Ratings Yet)
Loading...

Ingredients

  • 4 cups chopped rhubarb
  • ¼ cup sugar
  • 1 TBSP lemon juice
  • 2 lg egg yolks and 1 large egg
  • 2/3 cup sugar
  • 1 cup whole milk
  • 2 cups heavy cream
  • 1 tsp vanilla (instead of vanilla, 1 tsp grated orange rind

Instructions

1

Prepare ice cream maker according to manufacturer’s instructions.

2

Step 1:

3

4 cups chopped rhubarb

4

¼ cup sugar

5

1 TBSP lemon juice

6

Mix in a small saucepan and cook over medium heat, stirring regularly, for 12-15 minutes until the fruit is soft and liquid is absorbed. Cool. Puree the mixture in a food processor or blender.

7

Step 2:

8

2 lg egg yolks and 1 large egg

9

2/3 cup sugar

10

1 cup whole milk

11

2 cups heavy cream

12

1 tsp vanilla (instead of vanilla, 1 tsp grated orange rind

13

Whisk together eggs, sugar and milk. In a saucepan, heat the cream until it starts to bubble at the edges. Don’t boil. Temper the egg mixture by gradually adding drizzling the hot cream into the egg mixture. Blend and return to the saucepan. Cook, stirring constantly, over medium heat until the mixture coats a spoon and appears to be custard-like. Make sure it doesn’t boil. Pour the custard through a sieve to remove any bits. Allow it to cool in a bowl covered with plastic wrap and then refrigerate until very cold. I let the custard chill for 24 hrs.

14

Step 3:

15

Mix the rhubarb puree into the custard. Pour into the frozen bowl of the ice cream maker and churn using manufacturer’s instructions. Put into freezer containers leaving at least a 1.5 inch headspace. To prevent crystallization, put a piece of parchment paper on top of the ice cream and then add the lid.

16

To serve, bring the ice cream out of the freezer for at least 10 minutes to soften and make it scoopable.

Preserving Know-how/ Summer

A Word About Wild Pickling

Ramps (wild leeks) and fiddleheads are just two of the great foraged foods to pickle in spring. Whether you use a quick pickle method or pickling for long-tern storage, here are a few tips for wild pickling.

Wild Leeks

The beautiful wild leeks lie at the bottom of the deciduous forests. Both the leaves and bulbs are edible. They are wonderful to use in cooking as a sauté, in a soup, as a pesto or pickled. As wild leeks are being over-harvested in many areas, my policy is to take a minimalist approach – pick sparingly and never take more than a 1/6th of a clump. For pickling, because I generally have a small amount, I will do a quick pickle using only the bulbs. I use the greens to make and freeze a wild leek pesto.

Quick Pickled Wild Leeks (Test Kitchens of America)

Clean and trim wild leeks saving leaves for another purpose. Prepare a brine of 1.5 cups vinegar (any kind as long as it’s 5%), 1.5 cups water, 3 TBLS sugar, 2.5 tsp pickling salt and herbs or aromatics of your choice. Mix and bring to a boil. Put leeks tightly into clean, hot jars. Ladle brine over top. Leave a ¼ inch headspace. Clean rims and let jars cool on the counter. Once cool, put lids and rings on, label and refrigerate. Leeks will last, refrigerated, for 3 to 4 weeks. PS: If you have excess brine, you can pickle other vegetables!

Fiddleheads

While fiddleheads can be foraged, they are readily available in markets and grocery stores at this time of year. If you forage, check with a reputable foraging site to properly identify the Ostrich fern which is the only edible variety of ferns. Many ferns are toxic so identifying the right ones is critical. Fiddleheads are a bit “fiddley” when it comes to preparation, but the process is important to make them safe for consumption. They should be soaked in water, scrubbed to remove the papery film, and rinsed several times. They should be steamed for 10-12 minutes or boiled for 15minutes. Now they are ready for cooking or pickling.

preservingwithmartha@gmail.com: 

Dilly Fiddleheads (University of Maine Extension)

1 Star2 Stars3 Stars4 Stars5 Stars (No Ratings Yet)
Loading...

Ingredients

  • 3 lbs raw, trimmed and cleaned fiddleheads
  • 8 cups cider or white vinegar (5%)
  • ½ cup pickling salt
  • 1 tsp dill seed per jar
  • 1 clove peeled garlic per jar
  • 1 tsp red pepper flakes per jar (optional)

Instructions

1

Clean and prepare fiddleheads as described. Make the brine: Add vinegar and salt in a saucepan and bring to a boil. Pack fiddleheads in clean, hot jars. Ladle in the brine to ½ inch headspace. Remove air bubbles and adjust headspace again. Clean rims and place lids and rings on to finger-tip tight. Process in a water-bath or atmospheric steam canner for 15 minutes adjusting for altitude. When complete, let rest for 5 minutes before removing from canner.

Preserving Know-how/ Preserving Recipes/ Summer

Chive Blossom Vinegar

The blossoms of chives are bountiful at this time of year. While blossoms can be used to adorn salads, soups, or meats, they can also be used to create a flavourful shelf-stable vinegar to please the pallet the whole year through.

I make many herb vinegars, but I love the chive blossom vinegar for its gorgeous rosy colour and delightful taste. Once it is ready, it will make a super vinaigrette or an addition to a sauce to brighten the taste. Because vinegar is acidic (at least 5%), it is an environment unconducive to most bacteria. It is possible for some yeasts and molds to grow in this environment so if you notice mold or see bubbles indicating yeast fermentation, don’t use it. But overall, herb vinegars are safe. I’ll note that herb infused oils are another story. Oils with herbs and/or garlic create an environment highly conducive to the worst bacterium clostridium botulinum (you got it – the botulism bacteria). It is possible to safely produce herb-garlic infused oils by acidifying the herbs and garlic, but please refer to the National Centre for Home Food Preservation for specific instructions about how to do it safely.

Making chive blossom vinegar, like all herb vinegars, is a two-step process. First, the sanitized herbs are placed in a sterilized Mason jar (warm) and hot vinegar is poured over. The mixture is left to steep for 2 weeks although you can decide to use a shorter time if you wish. At the end of the steeping period, the blossoms or herbs are strained out. I use two steps: First, strain using a sieve reserving the liquid. Second, pour the liquid through a dampened coffee filter to remove small sediment. The second phase of the process involves sterilizing the glass jars you will use to store the vinegar and heating the herb-infused vinegar to just below boiling point. Then de-cant the vinegar into the warm jars or bottles leaving a ½ inch headspace. Cool, put on lids, caps or corks, label and store in a cool, preferably dark location.

The particulars:

For chive blossom vinegar I use white wine vinegar and about ½ cup of blossoms for 500 ml. It’s really a matter of how many blossoms I can get my hands on.

Sanitizing solution: Blossoms or herbs should be knocked gently to remove insects or debris. It is recommended that they be quickly submerged in a solution of ½ tsp household bleach to 3 cups water, then thoroughly rinsed and patted dry.

Jar sterilization: Use the dishwasher cycle if you have it or submerge the jars or bottles in boiling water for 10 minutes. Invert on a towel and fill with the hot vinegar while warm. If you are using bottles with corks, use only new corks and sanitize them by dipping them in boiling water 3 or 4 times.

Getting creative: As the herbs begin to produce, it’s possible to create various infused vinegars. Strong herbs blend well with apple cider vinegar or even white vinegar. Milder herbs like chives, basil, tarragon blend well with white wine or champagne vinegars. Fruits also make super vinegars. You can experiment to determine what you enjoy.

The chive blossoms are here and ready to be used as culinary accents or to be infused into vinegar for a gloriously tinted vinegar with a gentle chive background ready to elevate your vinaigrette to new heights!

preservingwithmartha@gmail.com


Preserving Recipes/ Summer

Get Pickling

It is the wonderful time of year for pickling. The gardens and markets are bursting with fresh vegetables and fruits. And pickling enables us to enjoy local, healthy produce all year round. There are several approaches to pickling such as refrigerator pickles for short-term use, fresh pack quick process pickles for long-term storage, and fermented or brined pickles. What these methods have in common is that they use a brine and pickling solution to control acidity which is necessary for safe preserving. Pickles, relishes, salsas, chutneys and even pickled fruit add tang to any meal.

Fresh Pack Quick Process Pickles

This method is easy to do and involves covering vegetables or fruit with a boiling solution of vinegar, spices, seasoning and sometimes sugar and water. This is called the pickling solution. Many recipes call for the vegetables to be brined in a salt and water bath for several hours before they are pickled. The purpose of the brining is to extract water from the vegetables so that they will later absorb the pickling solution more readily and it also creates a crisper product.

Fermented Pickles

In this method, vegetables are submerged in a salt-water brine for one to several weeks. The brine controls bacteria, preventing the growth of spoilage bacteria while allowing the growth of lactobacillus bacteria which produces lactic acid. Weights are necessary to keep the vegetables submerged under the brine to prevent the growth of molds and yeast.

Pickling requires specific amount of salt and vinegar to create a safe canning environment. Don’t be tempted to cut back on salt. It is a functional element of pickling. The salt bonds with water reducing microbial growth. Only use pickling salt or salt that is free from added iodine or anti-caking products. Because pickling controls acidity, it is important to use vinegar that is at least 5% acetic acid. To maintain the proper level of acidity you can’t just add extra vegetables (which are alkaline) to a recipe as this creates a potentially unsafe canning environment. So, stick to a tested recipe that specifies the correct amount of salt and acid for vegetables or fruit.

I have been expanding my pickling this year. Salsa, relish, chili sauce, dill and bread & butter pickles, mustard pickles, pickled asparagus, carrots, beans, beets, and wonderful mixed pickle blends using cauliflower, beans, cucumbers, zucchini, sweet and hot peppers, carrots and spices to create a beautiful salad in a jar. Coming up? Spiced pickled crab apples!

I know many of you are keen picklers. If you haven’t done much in the way of pickling, give it a shot. There is nothing nicer than opening a jar of vegetable or fruit pickles to accompany lunch or super or just as a snack. Even for breakfast! Scrambled eggs and chili sauce!

For information: preservingwithmartha@gmail.com

Preserving Recipes/ Summer

Zucchini Yummies

Zucchini Balls

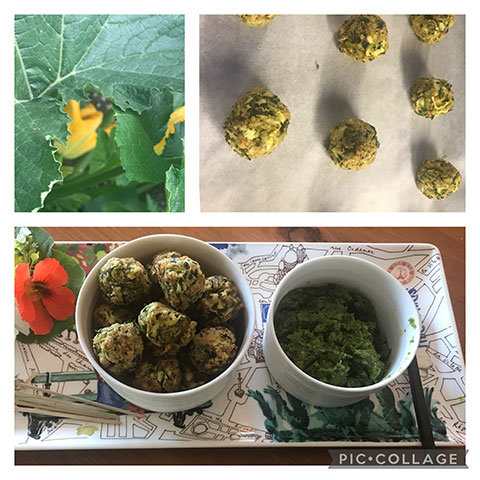
Zucchini are beginning their summer bounty. Even people with just one plant are always on the lookout for different ways to use this vegetable. Snuck into sweet breads or marmalade; substituted for cucumbers in relish, dills or bread & butter pickles; dehydrated for use in winter soups; or blossoms stuffed with a savoury meat filling. The uses of zucchini are endless.

Here is a super simple, versatile recipe for baked zucchini balls. Great as an appetizer or as a substitute for meatballs in any recipe. They also freeze well. In the photo, I served them with a garlic scape pesto.

For information: preservingwithmartha@gmail.com

Zucchini Balls

1 Star2 Stars3 Stars4 Stars5 Stars (No Ratings Yet)
Loading...

Ingredients

  • 2 cups of grated zucchini, seeds removed and well drained
  • 2 eggs
  • 2/3 cup breadcrumbs (I use gluten free panko)
  • ½ cup grated parmesan
  • 4 TBSP finely chopped herbs (if using dried herbs, 4 tsp)
  • ½ tsp salt
  • ¼ tsp pepper

Instructions

1

Set oven at 400. Line 2 baking sheets with parchment.

2

Wash zucchini. Remove seeds. Grate zucchini on a box grater.

3

Salt the zucchini and let it rest for 5 minutes. Then squeeze it firmly until all liquid is removed. Roll it in a paper towel to remove final liquid residue.

4

In a medium bowl, stir eggs, herbs and cheese. Add zucchini and breadcrumbs. Mix.

5

Roll into 1.5-inch balls and bake for 20 minutes until brown. Serve hot or at room temperature. Freeze leftovers once cool.

6

Customize the recipe: Go Greek and use feta cheese and oregano and serve with tzatziki; go French and use Gruyere cheese and serve with a tarragon-Dijon mayo; go Italian and use mozzarella and basil and serve with roasted tomato sauce; or go vegan and remove cheese all together.

7

Because of high moisture content zucchini and cousins summer squash don’t freeze or pressure can very well. Think mush! But they are wonderful pickled, barbecued, or used fresh in baked goods, soup or appetizers.


Preserving Recipes/ Summer

Flavoured Vinegars

Flavoured Vinegar

Add a sparkle to your vinaigrette. Create beautiful, unique gifts. Decorate using bottles filled with colourful flavoured vinegars. Featured here are two vinegars I recently made, one with chive blossoms and the other with tarragon. Herbs, spices, and fruit can be added to any vinegar if it is at least 5% acidity. Knowing how to properly make these vinegars will ensure a safe product without yeast causing cloudiness.

Vinegar is one of the very few foods that has played remarkable roles in cooking, medicine, food preservation and cleaning! Incredibly, its history dates back to 5000 BCE. Today we enjoy many varieties of vinegars which can be elevated to exquisite levels with the addition of fruit, herbs, and spices. Give it a try!

For information: preservingwithmartha@gmail.com

Flavoured Vinegar

1 Star2 Stars3 Stars4 Stars5 Stars (No Ratings Yet)
Loading...

Ingredients

  • For each 500 ml of vinegar, use:
  • 3 to 4 sprigs fresh, washed, and sanitized herbs
  • 3 TBSP dried herbs
  • 1 to 2 cups fruit, frozen is great
  • Rind of one orange or lemon
  • Other additions may include peeled garlic, peppercorns, jalapeno peppers, spices such as cinnamon or star anise.

Instructions

1

Choose Your Combo

2

Select the type of vinegar you want to work with and the herbs, spice, and fruit. Milder vinegars such as wine or champagne are best suited for tender herbs. Cider vinegar goes well with fruit. White vinegar is sharp but is suitable for stronger herbs and spices.

3

Sterilize & Sanitize

4

Sterilize canning jars by boiling them for 10 minutes. Keep them warm until you are ready to pour in vinegar that has been heated to just below boiling point. For fresh herbs, wash carefully. Then sanitize the sprigs in a solution of 1 tsp bleach and 6 cups water. Rinse thoroughly and dry. This step is important to prevent bacteria & yeast formation. Pour vinegar over herbs, spice, or fruit. Put sterilized lids on and move the jars to a cool, dark location.

5

Percolate & Decant

6

Let the infusion rest a minimum of 10 days but full flavourings will happen in about 3 weeks.  After this resting period, strain the vinegar through cheesecloth or a coffee filter. Sterilize jars for final bottling. Pour heated vinegar into jars. If desired, add a sprig of clean, sanitized herbs, fruit, or spices. Apply a tightly fitting lid. Date and label the jars.

7

Flavoured vinegars are best used within 3 months. Fruit vinegars can discolour after that time. Refrigeration will extend the quality to up to 8 months according to the University of Georgia.

8

A couple of caveats: Use only commercial vinegars for this purpose. Also note that flavoured vinegars can be safely made at home, but flavoured oils cannot. Flavoured oils pose a botulism risk so stick with flavouring vinegars for home use and for gifts.


Summer

Currants in Abundance

I am lucky to know someone who has several currant bushes and is eager to have them picked and used. Red, white, and black currants, so plentiful, I couldn’t possibly use them all. With gratitude, I ventured down the path of learning about and preserving these stunning little fruits.

Currants were cultivated in Scandinavia centuries ago and were domesticated in Europe during the mid 1500s. The term “currant” was used because of the fruit’s resemblance to dried currants from Greece made from small seedless grapes. Currants are anti-oxidants and are Vitamin C powerhouses. Black currants provide 338 % of daily Vitamin C requirements. During WWII, the extreme shortage of citrus fruit in England prompted Winston Churchill to encourage people to grow black currants to stave off scurvy!

Currants are excellent as jams and jellies. They are exceptionally high in pectin and acid which make them perfect for jams and jellies. Black currants are the base of the liqueur called “Cassis” which can be made at home. Black and white currants can be added to a fruit salad or baked goods, but red currants are too tart to be eaten raw. Still, red currants have a long history of being used as a jelly, sometimes solo or sometimes mixed with port, citrus, and mustard (Olde English Cumberland Sauce) and used with game or other rich meats. All currants can be frozen or dehydrated.

If you are making jams and jellies, there are a few helpful tips. Unlike black and white currants, red currants are tarter and have large seeds which generally should be removed using a food mill. I made a jam of black and red currants without seeding the red ones and it worked out nicely because of the balance between red and black. But I also made a raspberry-red currant jam where I cooked the red currants first and passed them through the food mill creating a puree. It’s really a matter of personal taste. Because currants are so high in pectin, do not be tempted to add commercial pectin. A nasty hard mass will result! Remember also, currant jams and jellies will continue to firm-up for 24 hours after they are removed from the canner.

There are many recipes from reputable sources, but for a flexible batch format, I like the recommendation from chef David Lobovitz who suggests a 1 to 1 ratio of currant puree to sugar. Once the mixture comes to a full rolling boil, boil hard for about 8 minutes. Check the gel point. If desired, add a teaspoon or two of Cassis or Kirsch. For long-term storage, process in a water bath or steam canner for 10 minutes. Rest for five minutes and remove to allow the jars to rest undisturbed for 24 hours.

For more information:

Preservingwithmartha@gmail.com

For information: preservingwithmartha@gmail.com


Preserving Recipes/ Summer

All Around the Mulberry Bush

I recently stumbled upon a grand, sprawling and very ancient mulberry tree. Although most mulberries have a short life span, it’s reported that there are specimens 250 years old! White, red, and black mulberry bushes and trees originated in China and India thousands of years ago and were domesticated around the world thereafter. Some cultivation was specifically done to feed silkworms that enjoyed the leaves. Today, wild, and domestic mulberries abound. I think of them as an old-fashioned fruit often made into pies, jams, jellies, juices, wine, and ice cream.

Mulberries are rich in Vitamin C and are therefore considered to be a “power food” with high anti-oxidant capabilities. They have low acidity and are low in pectin, both of which inform food preservation practice. This means that jams and jellies will require acidification and a generous addition of pectin. You can dehydrate, freeze, can whole in water, syrup, or juice, or make jams & jellies. Jelly might be preferred because just like raspberries, mulberries also have a lot of little seeds that aren’t pleasant.

The National Centre for Home Food Preservation provides recipes using both powered and liquid pectin. There are many online stories about failed sets with mulberries, so I suggest you use this recipe if you’re lucky enough to have mulberries in your backyard.

“Round and round the mulberry bush” is an old English nursery rhyme familiar to many of us. Though we would not find many monkeys chasing weasels these days, we are still fortunate to find mulberry trees and bushes providing us with beautiful fruit for preserving.

For information: preservingwithmartha@gmail.com

Mulberry Jelly (yield is 8 cups)

1 Star2 Stars3 Stars4 Stars5 Stars (No Ratings Yet)
Loading...

Ingredients

  • 3 cups mulberry juice (extracted from 3 pounds of berries, cleaned, and trimmed)
  • ½ cup lemon juice
  • 7 cups sugar
  • 2 pouches liquid pectin

Instructions

1

Put cleaned mulberries in a large pan, crush them until juices are released. Bring to a simmer and cook for 15 minutes. Put into a dampened  jelly bag or cheesecloth lined sieve and drain off the juices. Measure 3 cups.

2

Add juice, sugar and lemon juice to the pot and bring to a full rolling boil (the boil cannot be beaten down). Add the full packets of liquid pectin. Bring back to a boil and boil hard for 1 minute. Pour into clean, hot jars. Clean rims of jars. Affix lids and rings to ‘finger-tip tight’.

3

Place jars in a boiling water bath canner or steam canner and process for 10 minutes adjusting for altitude. Let rest 5 minutes. Remove to a heat-proof surface and let stand for 24 hours. Check seals, label, and store for up to 2 years.


Summer

Gooseberries

Gooseberries

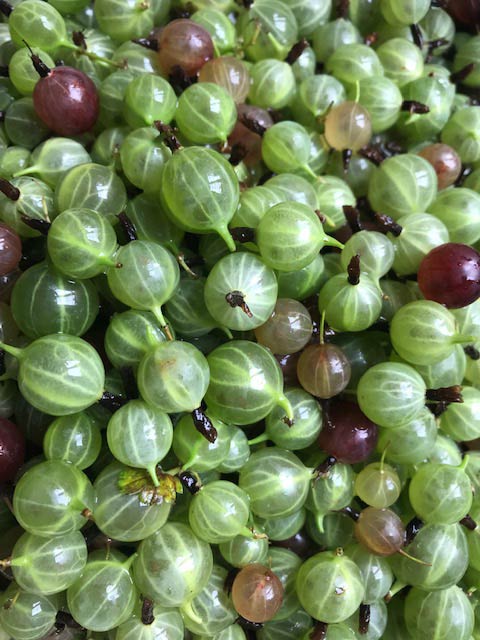
I am most grateful to a reader of my regular column “Worth Preserving” in the Dundalk Harold and Flesherton Advance who got in touch with me about her over-abundance of gooseberries (thank you Jean). She generously offered 10 pounds and off I started on a gooseberry journey.

I first read a reputable source saying the gooseberries are so named because they were often served with (you guessed it) goose! According to British Food: A History, this isn’t the case. Although true that gooseberries pair well with goose and other poultry, the name comes from Old Norman/Middle English words “grosse, grosier” or, in French “groiselle” which means red currant. Yes, the gooseberry is a relative of currants. They are all part of the ribes genus of which there are 150 different species. Gooseberries date back to 15th century in England when there were growing registries and gooseberry clubs by the hundreds.

The gooseberry has a long history in part because it was a relatively easy bush to grow, provided early fruits, and was plentiful. What generations before didn’t know was how good gooseberries are for health. They are very high in Vit C, are antioxidants, are rich in fibre. They are associated with heart health, brain health, stabilizing blood sugar levels and immune system function. Not too shabby on the health front.

Gooseberries are a little finicky to work with. They need to have the tops and tails removed which is time-consuming to be sure. I decided I could cope with some “tops and tailing” but not for the whole 10 pounds.  I first chose a Bernardin recipe for Gooseberry Conserve that mixes gooseberries with orange and golden raisins, it’s a lovely combination of flavours that could be used for an accompaniment to meats, poultry or even a spice cake or ice cream. And then I turned my attention to gooseberry jelly using a recipe from “So Easy to Preserve” that is the recipe book from the University of Georgia, home of the National Centre for Home Food Preservation in the US. The jelly turned out to be a most gorgeous pink. Still with an edge of sweet/sour, I can see this jelly as an accompaniment to poultry or as a glaze on meats. If you like the little bit of tartness, the jelly would also be great for a peanut butter and jelly sandwich.

Generous gifts lead to new learnings and experimentation. Sometimes nature’s bounty is in our backyard ready to share, to teach us about history and health, and to contribute to our winter pantry.

Get in touch:

Preservingwithmartha@gmail.com

martha@thevalleypreservery.ca